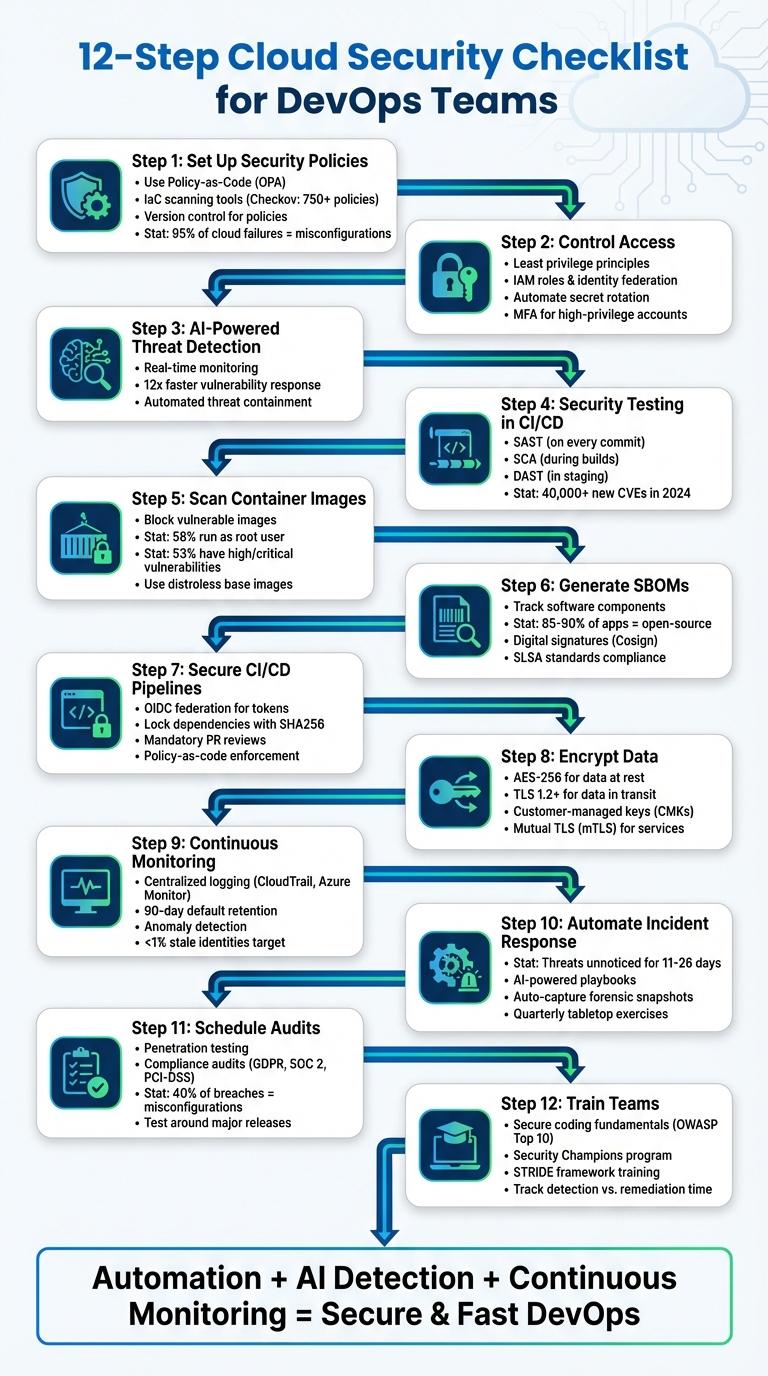
Cloud Security Checklist: 12 Steps for DevOps Teams
Twelve practical DevSecOps steps to secure cloud environments: policies, least-privilege access, CI/CD testing, image scans, SBOMs, monitoring, and...
Cloud security is a growing challenge for DevOps teams Balancing fast development with secure practices is tough, but skipping security steps leads to risks like container vulnerabilities, misconfigurations, and supply chain attacks. The solution? Build security into every stage of development using automation, AI, and clear processes. This checklist breaks down 12 practical steps to keep your cloud environment secure without slowing down workflows:
- Set Up Security Policies: Use Policy-as-Code and IaC scanning tools to enforce standards.
- Control Access: Apply least privilege principles and automate key rotations.
- AI-Powered Threat Detection: Monitor threats in real time and act faster.
- Security Testing in CI/CD: Add SAST, SCA, and DAST tools to pipelines.
- Scan Container Images: Block unsecure images before deployment.
- Generate SBOMs: Track software components to manage supply chain risks.
- Secure CI/CD Pipelines: Limit permissions, lock dependencies, and scan for secrets.
- Encrypt Data: Use AES-256 for data at rest and TLS 1.2+ for data in transit.
- Continuous Monitoring: Centralize logs and detect anomalies early.
- Automate Incident Response: Speed up containment and forensic analysis.
- Schedule Audits: Penetration tests and audits catch complex issues.
- Train Teams: Teach secure coding and set up Security Champions.
These steps combine tools, automation, and team training to reduce vulnerabilities while keeping development fast and efficient. Let’s dive into the details.
12-Step Cloud Security Checklist for DevOps Teams
Unlock DevSecOps: The Secrets to Secure DevOps
sbb-itb-d663cbd
Step 1: Set Up Security Policies and Guardrails
Security policies are your first line of defense, but they’re only effective if properly enforced. Did you know that over 95% of cloud security failures stem from customer misconfigurations? This highlights how easily breaches can occur when resources are deployed without safeguards in place. By establishing these guardrails early, you set the stage for automated checks in your CI/CD pipeline later on.
Start by defining security controls using Policy-as-Code tools like Open Policy Agent (OPA). These tools help enforce standards such as CIS, NIST, or SOC 2 directly in your development workflows, preventing developers from unintentionally exposing services.
"Using templates to define your standard security controls allows you to track and compare changes over time using a version control system." - AWS
To catch configuration errors early, integrate Infrastructure-as-Code (IaC) scanning tools into your CI/CD pipelines. Tools like Checkov, which comes with over 750 predefined policies, can automatically flag issues like publicly accessible S3 buckets, overly permissive IAM roles, or security groups with open SSH access (0.0.0.0/0). These tools can also block builds whenever high or critical vulnerabilities are detected. Storing these policies in version control ensures consistency and allows for quick rollbacks when needed.
Version control isn’t just for code - store all security policies and IaC templates there, too. This approach not only helps track changes but also enables drift detection. Drift detection continuously compares your live cloud setup against predefined templates, identifying unauthorized manual changes that might introduce vulnerabilities. For Kubernetes environments, you can enforce Pod Security Standards (Privileged, Baseline, or Restricted) at the namespace level. Additionally, setting runAsNonRoot: true and readOnlyRootFilesystem: true in container security contexts can minimize the impact of potential breaches.
To streamline the process for developers, offer a self-service catalog of pre-approved, standardized templates for deploying cloud resources. This reduces the likelihood of manual misconfigurations while keeping development workflows fast and efficient.
Step 2: Apply Least Privilege Access Controls
Once your security policies are in place, the next step is putting them into action by controlling access through the principle of least privilege. This approach is simple but powerful: only grant identities the permissions they need to perform their tasks - nothing more. In AWS, for example, IAM users and roles start with zero permissions by default, and you must explicitly grant access through policies. This "deny-by-default" model forces you to carefully evaluate what each user or role actually requires.
To begin, create a job role matrix that outlines the access levels needed for various roles in your organization. If you're working with Kubernetes, limit access to specific environments by using namespace-level RoleBindings instead of ClusterRoleBindings. Avoid using wildcards like * in your policies, especially for resources, as this can unintentionally grant access to current and future object types. Be precise - add only the specific service actions and resources each role needs.
For additional security, use IAM roles and identity federation to issue short-lived credentials for both human users and machine workloads. This is a safer alternative to long-term access keys. For example, in CI/CD pipelines, you can use OIDC to federate identities from platforms like GitHub or GitLab. By exchanging short-lived tokens for credentials, you eliminate the risk of storing long-term keys in repositories. To further strengthen your setup, enforce organization-wide limits with service control policies (SCPs).
SCPs, along with account-level Permissions Boundaries, act as guardrails to ensure no permissions exceed the defined limits. This prevents accidental privilege escalation by developers. For scaling access management, consider implementing Attribute-Based Access Control (ABAC). ABAC dynamically grants permissions based on resource tags and identity attributes, such as project-specific tags.
To complete your access control strategy, automate secret rotation to reduce the lifespan of potentially compromised credentials. Identify and revoke access keys older than 90 days using credential reports. Use IAM Access Analyzer to generate fine-grained policies from CloudTrail logs, ensuring your permissions are as specific as possible. For high-privilege accounts, require MFA for an added layer of security. Finally, for production environments, adopt Just-in-Time (JIT) access. This method grants temporary permissions only when needed and requires MFA for these critical "break-glass" situations.
Step 3: Deploy AI-Powered Threat Detection
Once access controls are secured, the next step is to add an AI-powered defense layer. These tools monitor your cloud environment in real time, analyzing massive amounts of security data to identify patterns that human teams simply couldn't detect on their own. They don’t just flag issues - they also provide crucial context, helping your team quickly understand the potential impact of misconfigurations and vulnerabilities.
The key advantage here is speed. AI-powered tools can address vulnerabilities up to 12 times faster than traditional manual methods, cutting response times down from months to just minutes. By integrating these tools into your existing workflows, you can significantly improve efficiency while staying ahead of potential threats.
Today's leading AI-powered threat detection solutions go beyond just spotting vulnerabilities. They analyze threat actor behavior and can detect potential breaches, like identifying when a cloud function is maliciously invoked. For containerized environments, these tools integrate directly into your CI/CD workflows, scanning container images before they even reach your private registry.
To take full advantage of these capabilities, embed AI-driven solutions into your CI/CD pipelines and runtime environments. These tools can check for known CVEs (Common Vulnerabilities and Exposures) and use automated runbooks to take action - whether that’s redeploying images, applying patches, or isolating compromised containers. They can even revoke credentials or block malicious API calls within seconds [50, 53].
AI also excels at automating time-consuming tasks like malware analysis, generating security rules, and identifying misconfigurations. Tools like Automate Security offer real-time monitoring and automatic responses, streamlining your defenses. Some systems even allow you to interact with security event data using natural language queries, making threat hunting more accessible to non-security experts.
By addressing vulnerabilities during the development phase rather than after deployment, you can create a more proactive security environment. As Liran Tal from Snyk points out:
"Traditional cloud security frameworks, while essential, weren't designed to handle the unique risks that AI workloads introduce".
Modern AI detection tools fill this gap by monitoring not only traditional attack vectors but also AI-specific threats like model extraction, data poisoning, and adversarial attacks. These solutions ensure security is embedded into every stage of your pipeline, aligning perfectly with the broader goal of integrating security into all phases of development.
Step 4: Add Security Testing to CI/CD Pipelines
Incorporating security testing into your CI/CD pipelines is a critical step in ensuring secure software development. Leverage tools like SAST (Static Application Security Testing), SCA (Software Composition Analysis), and DAST (Dynamic Application Security Testing) at different stages of your pipeline. Here's how each plays a role:
- SAST examines your source code to identify vulnerabilities early in the development process.
- SCA scans third-party libraries for known vulnerabilities, such as CVEs (Common Vulnerabilities and Exposures).
- DAST evaluates running applications from an external viewpoint, identifying runtime issues like SQL injection or authentication flaws.
As Liran Tal from Snyk describes:
"DAST is a black-box testing methodology that analyzes running applications from an external perspective, simulating exactly how real attackers would probe for weaknesses".
Automate and Integrate Security Testing
To streamline security, automate these tests at appropriate stages of the pipeline:
- SAST should run on every commit to catch issues early.
- SCA is best executed during builds to assess third-party dependencies.
- DAST should be performed in staging environments to simulate real-world attacks.
Additionally, include IaC (Infrastructure as Code) scanning to identify misconfigurations before infrastructure provisioning. Automating these scans ensures vulnerabilities are detected without slowing down your team. For example, configure quality gates to block builds only for "High" or "Critical" vulnerabilities. This balance allows developers to maintain productivity while adhering to strong security practices.
The AWS Well-Architected Framework emphasizes this proactive approach:
"The goal of automated testing is to provide a programmatic way of detecting potential issues early and often throughout the development lifecycle".
Continuous Scanning: A Must
With over 40,000 new CVEs reported last year, continuous scanning is non-negotiable. Use pre-commit hooks to catch sensitive information, like secrets or credentials, before they enter your repository. Lightweight scans can run on every commit, while more resource-intensive DAST scans should be scheduled during off-peak hours to avoid pipeline delays. Early detection not only boosts security but also reduces the cost of fixing issues in production.
Generate an SBOM for Every Release
Wrap up your testing phase by generating a Software Bill of Materials (SBOM) for each release. This inventory provides visibility into your software's components, making it easier to manage supply chain risks and respond to new vulnerabilities in third-party libraries. By embedding security into your workflow from the start, you avoid the pitfalls of retrofitting it later.
Step 5: Scan Container Images Before Deployment
Securing container images is a critical step in building a strong security framework. Scanning container images before deployment helps block vulnerabilities that could otherwise compromise your systems. Consider this: 58% of container images run as the root user, and 53% of non-OS packages contain high or critical vulnerabilities. On top of that, less than 1% of nearly 3 million images on Docker Hub are certified. These numbers underscore the importance of thorough scanning.
To integrate image scanning effectively, make it a mandatory checkpoint in your CI/CD pipeline. Configure builds to fail automatically if critical vulnerabilities are detected before the images even reach your registry. Use inline scanning methods that only transmit metadata, ensuring both content and credential privacy. Additionally, scan all images at the registry level, especially those from third-party sources, before deployment.
Kubernetes admission controllers, such as Open Policy Agent (OPA), can block unscanned or noncompliant images, seamlessly extending your CI/CD security measures. Instead of relying on mutable tags, pin images with immutable sha256 digests to ensure consistency. Make sure your scanner examines both the base OS and application libraries, as vulnerabilities can lurk in either.
Given that new CVEs (Common Vulnerabilities and Exposures) are discovered daily, rescan images every few hours. As Sysdig emphasizes:
"Image scanning is not something you apply once, but rather a continuous checkpoint in several moments of your workflow".
Another critical step is auditing Dockerfiles. Remove root usage, insecure ports, and any exposed secrets to minimize risks.
Start with distroless or minimal base images to shrink your attack surface. For example, switching from a standard Ubuntu base to a distroless image for a simple Go application can reduce OS vulnerabilities from 24 to just 2. Use multi-stage Docker builds to exclude unnecessary build tools and compilers from your final production image. Enforce non-root users by including the USER directive in your Dockerfiles. Additionally, configure containers with read-only file systems to prevent attackers from writing malicious files if they gain access.
Step 6: Create SBOMs and Provenance Records
Once your container images are secure, take the next step by generating SBOMs (Software Bill of Materials) and provenance records. These tools are essential for strengthening your software supply chain security. An SBOM lists every component in your application, while provenance records document how and where the software was built. Considering that open-source components make up 85–90% of the average modern application, it's clear why this is vital. For instance, the Apache Log4j vulnerability affected over 17,000 packages in Maven Central, largely due to transitive dependencies rather than direct ones.
To stay ahead, automate the creation of SBOMs immediately after resolving dependencies and before packaging. Tools like Syft, Trivy, and CycloneDX CLI can integrate into your CI/CD pipeline, producing machine-readable inventories in standard formats like CycloneDX or SPDX. A well-documented SBOM should include:
- Component names and versions
- Unique package identifiers (purl)
- Checksums (e.g., SHA256)
- Supplier and license details
- Dependency relationships (direct vs. transitive)
Rani Osnat, SVP of Strategy at Aqua Security, highlights the importance of SBOMs:
"By providing comprehensive visibility into the components of a software supply chain, an SBOM plays a critical role in helping organizations get ahead of supply chain security challenges."
To ensure the integrity of your SBOM, digitally sign it using tools like Cosign. This guarantees it matches the shipped code. Additionally, follow SLSA (Supply-chain Levels for Software Artifacts) standards for build integrity. For instance, SLSA Level 3 mandates that provenance records are created by the build platform's control plane in an isolated environment, making them tamper-proof. Platforms like GitHub Actions and Google Cloud Build already support these standards[73,78].
Pairing your SBOM with a VEX document (Vulnerability Exploitability eXchange) helps determine if known vulnerabilities impact your deployment. Automate your CI pipeline to enforce these checks - fail builds if SBOM generation doesn’t complete or if high-severity vulnerabilities are detected. Additionally, use admission controllers like Kyverno or OPA Gatekeeper to block any container image without a verified signature or valid SBOM before it reaches production. These steps not only enhance security but also set the stage for further automation in your CI pipeline.
Step 7: Protect CI/CD Pipeline Security
Securing your CI/CD pipeline is essential for safeguarding your entire environment. Attackers often target these pipelines, as evidenced by incidents like the SolarWinds build system compromise, which spread malware to 18,000 customers, and Travis CI's exposure of over 73,000 sensitive tokens through public build logs. These cases underscore the importance of robust pipeline security.
Start by auditing your workflows for overprivileged tokens. Many pipelines operate with excessive permissions, granting unnecessary access to infrastructure. Replace static credentials with OIDC federation, issuing temporary tokens instead of permanent API keys. Assign only the permissions required for each task - deployment pipelines, for instance, should have pod-level permissions rather than cluster-admin rights.
Address the issue of unpinned dependencies. Lock down third-party package versions using tools like package-lock.json, and include cryptographic hashes in your lockfiles. For container images, rely on immutable SHA256 digests instead of mutable tags like latest or v1.2 to prevent substitution attacks. Configure your pipeline to reject builds lacking verified lockfiles or failing checksum validation. Once dependencies are secure, focus on refining merging practices.
Implement mandatory pull request reviews and disable auto-merge to maintain control over code changes. Use protected branches to ensure only verified, signed commits make it into the main codebase. Incorporate policy-as-code frameworks like Open Policy Agent (OPA) or Conftest to enforce security rules automatically. These tools can block containers running as root, prevent unapproved network access, or validate Terraform plans before deployment. Store all policies in version control and treat them like production code, complete with unit tests.
Run pipeline steps in isolated nodes or ephemeral containers to reduce the impact of potential compromises. Leverage automated secret scanning tools like GitGuardian, TruffleHog, or Gitleaks to catch hardcoded credentials before they reach production. Finally, set up alerts for unusual pipeline behavior to identify suspicious activity early.
Step 8: Encrypt Data at Rest and in Transit
Encryption is your shield for protecting data, whether it's stored or being transmitted. For data at rest, AES-256 is the go-to standard due to its resilience against brute-force attacks. When it comes to data in transit, ensure TLS 1.2 or higher is enforced across all cloud services. Additionally, configure load balancers to redirect HTTP traffic to HTTPS. Notably, AWS has deprecated older TLS versions for all API endpoints as of February 2024. This step enhances earlier security measures, safeguarding data confidentiality throughout its entire lifecycle.
Activate default encryption for all cloud storage options, such as block storage (EBS), object storage (S3), and managed databases like RDS. Use separate encryption keys for different data classifications. For example, production data should have distinct keys from development and testing environments to minimize the impact if a key is compromised. For sensitive production data, leverage AES-256 encryption combined with customer-managed keys (CMKs). CMKs offer precise access controls, manual rotation schedules, and full audit logs.
"Encryption maintains the confidentiality of sensitive data in the event of unauthorized access or accidental disclosure." - AWS Well-Architected Framework
Always store encryption keys separately from the data they protect. Accessing data should require two permissions: one to use the decryption key and another to access the service where the data resides. For virtual machines, enable Encryption at Host to ensure that temporary disks, disk caches, and data transfers to storage clusters remain encrypted. For S3 buckets, enforce policies that deny uploads or access requests unless secure transport protocols are used.
Automating compliance checks is crucial. Use tools like AWS Config or Azure Policy to identify and address unencrypted resources. Services like Amazon Macie can scan for sensitive data stored in unauthorized or unencrypted locations. To secure service-to-service communication, implement mutual TLS (mTLS), which ensures both authentication and encryption for internal traffic. Define all encryption configurations in your Infrastructure as Code templates, and validate them within your CI/CD pipelines. By embedding encryption into every layer of your system, you create a strong foundation for securing data and communication across your cloud environment.
Step 9: Set Up Continuous Monitoring and Logging
Centralized logging is essential for gaining a clear view of security events across your cloud infrastructure. Without it, critical security gaps can emerge, leaving your environment exposed to risks [113, 111, 115]. To avoid these blind spots, consolidate logs from key sources like VPC Flow Logs, DNS logs, load balancer access logs, and IAM events [112, 115].
Major cloud providers offer built-in tools to streamline log aggregation. For example:
- AWS: CloudTrail and CloudWatch Logs
- Azure: Azure Monitor with Log Analytics Workspaces
- Google Cloud: Cloud Logging with Aggregated Sinks [111, 113, 114]
In AWS, CloudTrail logs are retained for 90 days by default unless a custom trail is set up for extended storage. While most organizations keep logs available for active querying for three months to a year, compliance requirements may demand storage for up to seven years. These native tools align with earlier security measures and provide a solid foundation for monitoring.
"Identity remains the most targeted and most misconfigured control plane in the cloud." - Palo Alto Networks
To further enhance security, route all logs to a dedicated "Log Archive" account that is isolated from production environments [113, 116]. Secure these logs with encryption (e.g., AWS KMS) and implement WORM (Write-Once-Read-Many) storage solutions like S3 Object Lock to prevent tampering [111, 116]. Enforce Service Control Policies to block users from disabling critical logging services. Additionally, set up multi-region logging to detect unauthorized activity in regions that aren’t actively in use. This approach ensures your logs are both secure and comprehensive, forming the backbone of an effective monitoring strategy.
Anomaly detection is another critical layer. Use it to identify deviations from normal workload behaviors. Pay close attention to privileged events, such as the creation of new administrative users, granting of overly broad permissions, and deletion of CloudTrail logs [118, 122]. A strong security posture ensures fewer than 1% of identities are "stale" (inactive for over 90 days) and achieves 100% coverage of native cloud audit logs. Watch for high-volume secret retrievals from Secrets Manager and changes to S3 bucket policies that might enable public access.
For faster response times, integrate cloud alerts with SOAR platforms. These tools can enrich alerts with asset metadata and automate containment actions, like pausing compromised containers or quarantining virtual machines. Together, these practices create a robust system for continuous monitoring and quick incident response.
Step 10: Automate Incident Response Procedures
When a security incident strikes, quick action is key - especially since threat actors often go unnoticed for 11 to 26 days. Automated incident response protocols can cut out manual delays, enabling immediate containment. Tools like Automate Security, powered by AI, can analyze alerts across your cloud environment and act on anomalies, such as unusual API calls or privilege escalations, right away. For instance, automated playbooks can revoke tokens, rotate keys, and isolate compromised workloads in seconds. Considering that 29% of incident investigations in 2024 involved cloud or SaaS environments - and one in five directly impacted cloud assets - this kind of speed is essential.
"Automation helps avoid alert fatigue by using functions that process the repetitive and ordinary alerts, leaving humans to handle the sensitive and unique incidents." - AWS Well-Architected Framework
Automation shouldn’t stop at containment. It can also streamline forensic investigations. For example, resource tagging can trigger serverless functions to automatically capture memory and disk snapshots before ephemeral resources vanish. Graph-based analysis tools can further map out attack paths and define the scope of an incident. When integrated with your existing monitoring and logging systems, these automated responses strengthen your overall cloud security.
To stay prepared, schedule quarterly tabletop exercises that simulate scenarios like container escapes, serverless attacks, or multi-cloud breaches. After every incident - real or simulated - conduct a structured review to identify weaknesses and refine your automated systems. For example, you might adjust Service Control Policies in AWS or fine-tune Azure Policy rules. Tracking metrics such as Mean Time to Detect (MTTD), Mean Time to Contain (MTTC), and checklist completion rates can provide valuable insights into your progress. With internal threat detection averaging a 10-day dwell time, combining proactive monitoring with automation significantly reduces your exposure to risk.
Step 11: Schedule Regular Security Audits and Penetration Tests
While automated checks and continuous monitoring are great for catching known vulnerabilities, they can sometimes miss more complex logic flaws. That’s where regular security audits and penetration tests come in. These tests simulate real-world attacks and help verify compliance with frameworks like GDPR, SOC 2, PCI-DSS, or HIPAA. Skipping these tests increases your risk - studies show that over 40% of cloud security breaches in 2024–2025 will stem from misconfigured systems or unmonitored services. Regular testing is critical to staying ahead.
Incorporate continuous vulnerability scanning into your CI/CD pipeline to catch issues early, when fixing them is usually less expensive. Plan penetration tests around major releases or feature launches, when your systems closely resemble production environments. This timing ensures that any vulnerabilities can be addressed before they become real problems. For compliance audits, follow your regulatory schedule - whether that means annually or quarterly. For example, organizations handling payment data should align PCI-DSS audits with their certification cycles.
Use a centralized dashboard to manage security findings, track remediation timelines, and identify recurring issues. Advanced organizations often use automated tracking to keep inactive identities (those with no activity for over 90 days) below 1%. Linking audit results to your ticketing system can streamline triage and remediation efforts. Post-test reviews are another critical step - they help refine detection rules and keep your incident response playbooks up to date.
"Replace verbal assurance with telemetry. Prioritize domains where posture has drifted, threats have changed, or confidence is low." - Palo Alto Networks
For more disruptive tests, like penetration testing, use isolated clones of your production environment. This prevents any interruptions to live operations. Also, coordinate with your cloud provider before starting external penetration tests to ensure you’re following their policies.
Step 12: Train Teams and Improve Security Practices
Strong technical defenses are essential, but they won't stand on their own without a well-trained team. Building a proactive security culture starts with empowering your team through targeted training. This approach enables developers to create secure code from the beginning, reducing vulnerabilities early in the development lifecycle. As threats evolve, especially in areas like CI/CD pipelines and build systems, continuous education is key to recognizing new attack methods like dependency confusion and poisoned pipeline execution.
"Cloud-native security is not a one-time task - it requires discipline, automation, and collaboration across teams." - Mohinder Kumar
Begin by focusing on secure coding fundamentals, such as the OWASP Top 10 and CERT Secure Coding Standards. These guidelines cover essential practices like input validation, error handling, and encryption. Expand this training to include scanning Infrastructure as Code (IaC) templates and securing Docker and Kubernetes environments. Teaching teams to use the STRIDE framework - covering Spoofing, Tampering, Repudiation, Information Disclosure, Denial of Service, and Elevation of Privilege - can help them identify and address design flaws early.
Modern tools, like Automate Security, can further enhance your team's ability to adapt to new threats. Features such as AI-powered scanning provide real-time remediation suggestions directly within development environments, turning fixes into learning opportunities. These tools also monitor dependencies against databases like the National Vulnerability Database (NVD), ensuring your systems are safeguarded against newly disclosed vulnerabilities. Automated workflows can even generate pull requests for security updates, including compatibility testing, cutting down manual effort and speeding up remediation by as much as 12 times compared to traditional methods.
To scale security efforts effectively, designate Security Champions within your teams. These developers receive specialized training to conduct threat modeling and act as a bridge between development teams and centralized security functions. Security Champions enable efficient security reviews without creating bottlenecks. Implementing policies like "break-the-build" in CI/CD pipelines ensures that deployments are automatically halted when medium or high-risk vulnerabilities are detected, reinforcing secure practices.
Finally, track metrics such as "time-of-detection" versus "time-of-remediation" to measure progress and hold teams accountable. These practices, combined with earlier steps, create a robust framework for integrating security into every stage of your DevOps workflow.
Conclusion
Cloud security in DevOps is a continuous effort that thrives on discipline, automation, and teamwork. The 12 steps outlined here offer a structured approach to tackling security challenges across identity, data, and network layers. By embedding security measures early in the development lifecycle and maintaining ongoing monitoring, DevOps teams can minimize risks while keeping up with the fast pace of modern software development.
Automation, AI-driven detection, and constant monitoring are the backbone of effective cloud security. These tools help balance the need for rapid deployment with strict security measures, especially in complex, multi-cloud environments. As Eli Chachak from CyberDB puts it:
"Automation serves as the bridge between [rapid deployment and stringent security]. By automating repetitive and time-consuming tasks, teams can maintain a high level of security without sacrificing speed".
Incorporating security early in the CI/CD pipeline goes beyond immediate threat management - it brings long-term advantages. Fixing vulnerabilities before deployment is far less expensive and disruptive than addressing them in production. For instance, a financial organization that adopted threat modeling and a Security Champions program successfully identified and resolved numerous security issues pre-deployment, reducing production vulnerabilities without slowing development.
To fully realize these advantages, it’s essential to establish clear ownership, enforce policies through automation, and schedule regular reviews. As Dvir Shimon Sasson, Director of Security Research at Reco, highlights:
"The checklist itself isn't the security. What makes it work is how you wire it into your workflows".
Assign specific domain owners, connect policies to automated tools, and perform quarterly reviews to address posture drift and prioritize fixes. By following these 12 steps, DevOps teams can achieve the dual goals of speed and strong security in cloud environments.
FAQs
What are the first 3 checklist steps to reduce the biggest risks?
The three most effective ways to lower cloud security risks in DevOps workflows include:
- Enforcing least privilege access: This limits permissions to only what's necessary, reducing the risk of unauthorized actions and shrinking the attack surface.
- Implementing strong secrets management: Protect sensitive credentials by keeping them out of code or environment files, ensuring they're stored securely.
- Automating security testing in CI/CD pipelines: Integrate tools to identify vulnerabilities early by scanning Infrastructure as Code (IaC), container images, and Kubernetes manifests.
How can we add security scans to CI/CD without slowing deployments?
To seamlessly incorporate security scans into your CI/CD pipeline without slowing things down, rely on automated, non-blocking security checks. These checks can run alongside the build process, ensuring efficiency. Tools like static code analysis, container scanning, and vulnerability assessments can be set up to work without causing deployment delays.
Prioritize addressing critical vulnerabilities by using progressive enforcement strategies. This approach helps maintain the pipeline's speed while keeping security intact. Automation plays a key role here, enabling continuous monitoring without disrupting workflows.
What’s the simplest way to enforce least-privilege access for CI/CD and Kubernetes?
To ensure least-privilege access in CI/CD and Kubernetes environments, the key is to grant only the minimum permissions required for specific tasks on specific resources. By leveraging group and identity attributes, you can dynamically adjust permissions as needed while keeping security intact. This method keeps access tightly restricted, avoiding any unnecessary privileges.